
info: This tutorial is written for CPT211 Programming Languages Concepts and Paradigms of semester 2 academic session 2014/2015.
Before You Start
- You will need Intel IoT XDK Edition to deploy, run and debug IoT application.
- You will need a working and stable internet connection.
- an Micro-SD card.
*Note that in this guide, we use both Windows and Linux (Ubuntu 12.04) both for setting up the image to micro-SD, and run the project with Intel IoT XDK respectively. (Intel IoT XDK are available on Linux, Windows and OSX)
1. Prepare the Image
Download the latest image from IoT Devkit software page.
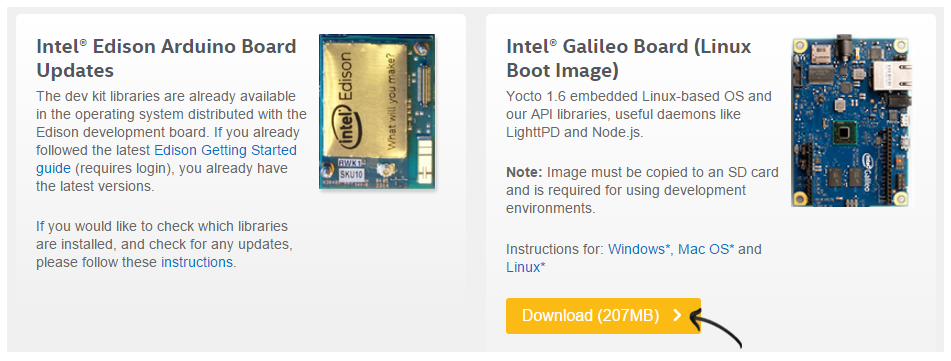
Direct link: Intel Galileo Board(Linux Boot Image)
Extract the downloaded image using 7zip.

Download Win32DiskImager utility to write the image into Micro-SD card. Install it as an Administrator. After successful installation, run Win32DiskImager as an Administrator.
Insert Micro-SD card and select the device drive for your inserted Micro-SD card.

Browse (Click on folder icon) and select the image. Be sure to select . file option in order to find your *.direct image. Then click Open to proceed.

Once everything is ready, write the image to selected Micro-SD card.

Upon completion, select Exit and close win32diskimager application. Now your micro-SD card is ready to be used with Galileo board.
2. Boot the Image
Put Micro-SD card into SD slot in Galileo board and boot your image.

Power on Galileo board and let the booting process takes place.
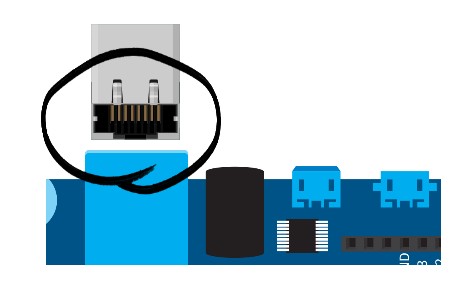
3. Attach Ethernet cable
Since we are using campus network, therefore we just attach Ethernet cable to Galileo while we will let Galileo to discover the IP (later on).
4. Writing and Runing Simple HTTP Server with Nodejs
Now you have two options that you can choose:
- Use Intel IoT XDK or
- Clasically write up the code and run your HTTP server in terminal console
4.1 Using Intel IoT XDK
Open Intel IoT XDK application. From Internet of Things (IoT) with Node.js Projects:, click “Start with a Sample or Template”. Then, choose “Analog Read” template and then click “Use This Template”.

Next, name your project as http-server and then click Create button to create the project.

You project will be created. You will see all the files created on left panel. Open “main.js” and remove all the sample codes and replace it with these lines:

var http = require("http");
var server = http.createServer(function(req, res){
	res.writeHead(200, "Content-Type" : "text/plain");
	res.end("hello world");
}).listen(5000);

console.log("Server is running http://X.X.X.X:5000");

Open package.json file and replace “AnalogRead” with “http-server”.

Now connect to IoT device. Choose ”- Select a Device -“ and check either your IoT device is discovered. If not the you can click ”[%] Rescan for Devices” to discover your IoT device. Once discovered, it should be displayed on the list with the IP address.

To start connect, select your IoT device. Left “Address: “ and “Port: “ boxes as default. Tick “Use secure connection” and fill up “User Name: “ with root.

Click Connect to start connection and you may see as below upon successful connection. Take note on the IP address written. Now you can add the IP address in console.log by replacing X.X.X.X.X with the actual IP in your code (main.js).
console.log("Server is running at http://10.207.146.57:5000");

To build the project, click Install/Build icon as shown below and then click Build to proceed.

Then upload the project to IoT device by clicking the Upload icon.

After that, click Run to run your simple HTTP server.

Simply check your running HTTP server. Open your browser and navigate to “http://localhost:5000”. You will see a “hello world” text.

References
